Showing posts with label Martha Stewart. Show all posts

Tuesday, 13 May 2014

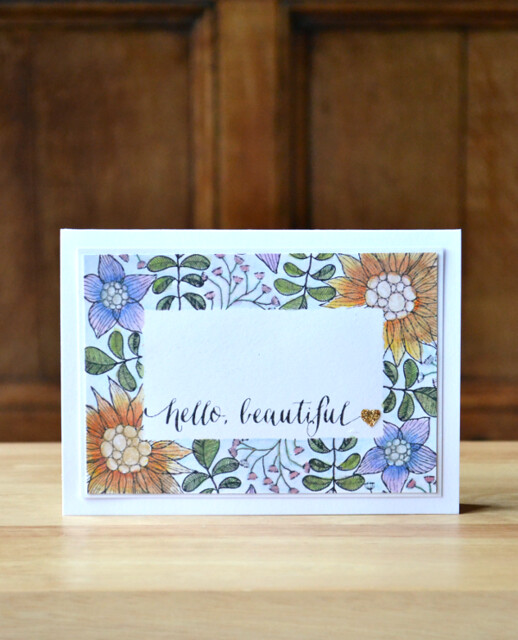
Hello, beautiful stamp set...

hello beautiful
Hey!

I'm still having a ton of fun with my watercolours thanks to the current Online Card Class: Watercolor class and some fabulous new goodies from Simon Says Stamp. As soon as I saw this stamp set (designed by Mama Elephant for SSS) I just knew it had to come and live here!

This card was so simple to make but took time to paint. It's definitely one of those cards you can't make in a hurry! I created a rectangular mask and stamped the different flowers/leaves over it before then painting it. I'm no gardener and I've no idea what colour these flowers should really be, so there's a bit of artistic licence here...*wink*

hello beautiful close up

I used a combination of  watercolour pencil crayons and some Twinkling H2O watercolours with added shimmer in them. It's really hard to capture the shimmery goodness, but it looks super pretty IRL. :)

tips and tricks
  • I stamped my sentiment a little off-centre - boo! To balance it, I punched a tiny heart from gold Cricut Iron On Material and adhered it. 
  • The real time consuming part of this card was waiting for parts of my painting to dry before adding more layers of colour. If you're really impatient, you could always blast wet sections with a heat gun. 
  • I tried to balance my stamping. There's nothing really random about it! Where I stamped one flower, I then stamped it again in the opposite corner.  
Well, that's enough gardening for one day. Though I have a feeling that this stamp set is going to be inked up a lot more when I can find the time to play some more!

Thank you so much for stopping by here today!

Signature2


Products Used

Monday, 10 February 2014

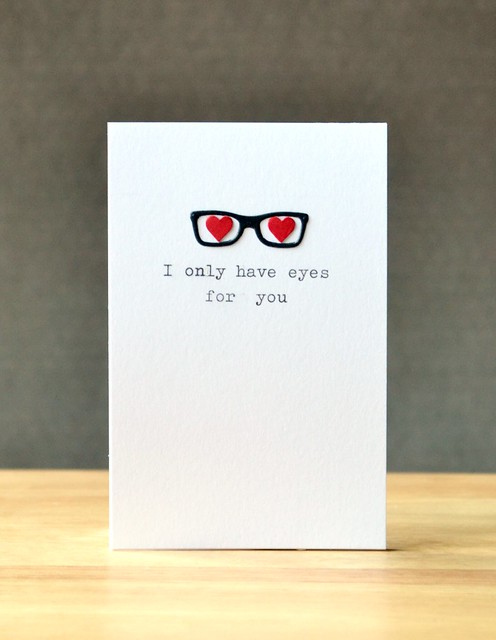
I only have eyes for you...

 This is my second post of the day. Please scroll down or click here to check out the new Clearly Besotted Stamps Challenge. Thanks! :)
 
I only have eyes for you
Hey!

I'm back again. Are you sick of me yet? Hope not LOL!

This post features a special card that features some Top Dog Die goodness. It's special because it's the card that I've chosen to give to my guy on Valentine's Day. Don't worry, we're not in any danger of him checking it out here beforehand! *wink*

Guys are hard to cater for at the best of times when it comes to card-making. Even more so when you're trying to show your love for them without wanting to create one mega-slushfest on a piece of card!

Well in order to avoid a slushfest, I started with the Top Dog Die glasses. I love these style of glasses. Total geek chic. Now simply add some hearts punched from a teeny border punch to those glasses and you've got yourself a card that is still CAS, but still conveys love. Throw in a punny sentiment for good measure, and we have a lovey dovey card for my guy. :)
tips and tricks
  • It's a little bit of trial and error when it comes to typing directly onto a piece of card. I practised first on scrap paper to ensure the layout of the text remained central.
  • Type/stamp on a larger piece of card first if you're not confident at stamping centrally. You can always trim a piece of card down after stamping to centralise it.
  • No typewriter? No problemo! You can download many typewriter style fonts free of charge and create your sentiment on a computer. 
We don't tend to go crazy on Valentine's Day, and I leave little cards for my guy all year round. However, we couldn't possibly let the day pass without giving a little token of love. There's a little more romance to this card than meets the eye...

See the sentiment? I hand-typed the sentiment using Olive. Olive is our vintage typewriter that has been passed down through my guy's side of the family. He lets me have it sitting pretty on my desk and I had the brainwave to use her on my card. It's a little way to thank him for letting me keep her, and to show that she's still loved. I think he'll appreciate the loving touch (I hope so anyway!)

Right then, the lovey dovey slushfest is over. Thanks for stopping by today! 


Signature2


Products Used

Sunday, 15 December 2013

Snowflakes. Squint and you might see some!

Let it Snow
Hey!

Happy Sunday! If you're anything like me, today you're starting to let the panic start to set in that you've done hardly anything for the holidays yet....! Eeek!

Worrying aside, I'm here today to share that I'm playing along with those talented Curtain Call Challenge gals as a guest designer. Thanks so much to Stacey for asking me to share the stage today!


 So today's card was inspired by this piccy for today's Sweet Snowflakes Curtain Call Challenge:

Photo Credit: akeptlife.blogspot.com

I was taken by the blue and pink colour combo and decided upon blue snowflakes and pink, glossy hearts. The winter daylight is doing my photography no favours here so sit up close to that monitor, squint, and squint some more and you just might be able to see some snowflakes falling from that cloud. :)

OK. Stop squinting. Here's a close up, but it's not much better I'm afraid!

Let it snow (close up)
I think you're just going to have to trust me that you can really see these pretty snowflakes much better IRL!
tips and tricks
  • To add a bit of extra dimension, I've covered my hearts with Glossy Accents and smothered my cloud with my clear Wink of Stella pen.
  • To add Glossy Accents to tiny embellishments easily, I like to stick them to a tiny piece of blu-tack so they don't stick to the table!
  • The design looked lost on a larger piece of cardstock, so I've created it on a smaller piece and mounted it on an extra layer.
The challenge is sponsored by Uniko Studio so it seemed rude not to ink up my Uniko Studio Stunning Snowflakes stamp set for it. The LEAD of this challenge will win a gift certificate to spend at the Uniko Studio store too. :)

Be sure to see how the special guests and crew inked up Stunning Snowflakes too. I'm pretty sure you'll be able to see their snowflakes without risking square eyes! *wink*

Sweet Snowflake Designers
Beverly Brown, Uniko Studio
Amy Wanford, Guest Designer (You're here!)
Amber Kroening
Barb Murphy
Christina MacLaren
Gayatri Murali
Kim Singdahlsen
Laurie Willison
Marisa Ritzen
Maureen Plut
Monika Davis
Sheri Gilson
Stacey Schafer
Tenia Nelson
Tracey McNeely

And of course, come and join in the sweet snowflake fun with us! If you're like me, you've got a ton of Christmas crafty projects to whip up still here's your perfect inspiration point!

Right, must dash, so much to do still and so little time!

Signature2


Products Used


Monday, 11 November 2013

Getting distressed (and messy!)....

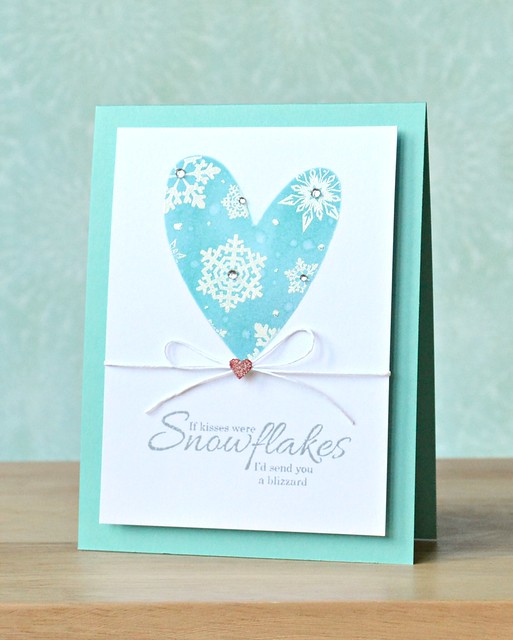
snowflakes blizzard
Hey!

Happy Monday! C'mon, look at the bright side: with every moment you spend reading this post, you're heading closer and closer to the weekend. Yup, that's my philosophy on Mondays. Ha!

I'm here today with a card for the Uniko Studio Blog Hop. This is no ordinary hop though, it's the last one of 2013 and so Christmas may have come a little bit early as we get to give away the sets we're featuring for it, or some store credit to one lucky commenter! You should have hopped over here from the Uniko Studio blog. Be sure to start there if you haven't!

The set I'm featuring today is Stunning Snowflakes. This set does not only feature snowflakes, but some pretty sweet sentiments too. This sentiment really jumped out at me, and as soon as I saw it, I knew it had to be the sentiment for my guy's Christmas card.

I've been so very inspired by Jennifer McGuire's snowy sky technique with Distress inks after seeing Debby Hughes rock it here. So one of my crafty purchases at a craft fair on Saturday was a few Distress Inks in various shades of blue. (Check out my Twitter or Instagram for a pic of my loot from the day if you're interested!)

Well I was a little nervous. I'm not usually a messy crafter. But I can say that I LOVE this technique! I only wished I had some Perfect Pearls in the right colour to finish it off, but I added my own sparkles in the form of gems and dots of dazzle with my new Wink of Stella pen. If you've not got your hands on one of these, you need to. Seriously. Sparkles galore! :)

Embossed snowflakes in white over the top of my masked ink heart finished off the focal point. It shimmers and sparkles way more IRL.

tips and tricks
  • This design doesn't only work for someone you want to send lots of kisses to! Simply change the sentiment or masked shape to suit a different recipient.
  • Any missed white embossed areas can be easily fixed up with a white gel pen. :)
  • I'm going to confess a 'boo boo' here: I stamped the sentiment far too low and it looked terrible! The design didn't flow, the eye didn't know where to look! However, a simple bit of twine treatment helped the design to flow better. You can rescue most 'boo boos' in my book! *wink*
Ready for the fun part? I have a £10 Uniko Studio Gift Certificate to give away to one lucky commenter. If you want to be in with a chance of winning it, please leave a comment by Thursday November 14th and I'll randomly pick a winner.

Next on your hopping adventure is Amber! :)

Signature2

Products Used

Copyright/Disclosure

I am on various design teams and receive free product to use and promote. I geniunely love the products of the companies and all opinons are honest and my own.

I'm flattered if I've inspired you and you want to CASE anything of mine, but please don't enter it for commercial publications or competitions.
Thank You!
All designs, text, and photographs on Crafting Confessions are ©2009-2016 to Amy Gray unless stated otherwise.