Showing posts with label Tutorial. Show all posts

Tuesday, 22 April 2014

Die -> Stencil -> Lettering -> Video Tutorial...

 Hey
Hey!

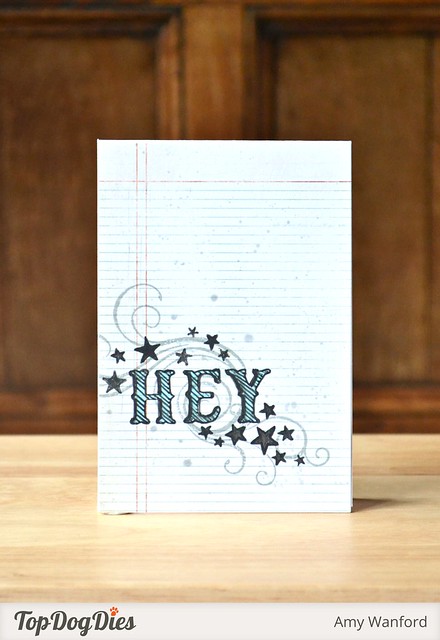
I'm over on the Top Dog Dies blog today with this card. It features a mish-mash of products and techniques. It's kinda similar to yesterday's card but I like to think that this one is a little more grungy. :)

I've been playing with stencils on this card (as well as stamping of course!) I used a swoon-worthy Memory Box stencil to select random stars to draw around my sentiment and I created a stencil of my own using a Top Dog Dies die.

I used the Top Dog Dies Vintage Alphabet Die to create my lettering by simple creating a stencil from it. I did the same for yesterday's card too. I've braved the camera and created a little mini-video-tutorial to show you exactly how I do this. I do babble a lot but I hope it gives you a better idea of how easy this is to do:
 

If you can't view the video for any reason, check it out here. :)

Easy, right?! To grunge up my card a little more I added some stamped flourishes and ink splatters - it makes such a difference to the design which looked a little bare before. However, I then realised the flourishes stamped over my lettering so I shaded the lettering using a pale blue marker.

Well that's all from me today! As always, thank you so much for stopping by today! 

Signature2


Products Used

Monday, 24 March 2014

A 'Hoppy' Place-Card...

This is my second post today. Please scroll down or click here to check out my Iron Craft post - thanks! :)
Easter Bunny Place Card
Hey!

I'm back again with what you could call a 'hoppy' project using Top Dog Dies goodies. :)

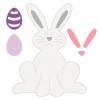
I've used the bunny die from the Top Dog Dies Bunny & Eggs Die Set to create a mini place-card. I love creating shaped mini cards using dies and I'm pretty sure I'm going to be making a few more of these for Easter. They're so easy and the hardest part was practising patience in waiting for the Glossy Accents to dry on this li'l rabbit's nose!

I'm sharing a tutorial on how I made this over on the Top Dog Dies blog. Check it out if you're interested. The method I use can be used on virtually any shaped die so you're not limited to bunny shapes! :)

As always, thank you so much for stopping by today!

Signature2


Products Used

Friday, 30 July 2010

Aimes on the Big Screen!

Hey!

Happy Friday, Peeps! Why do the weeks zoom by so fast when I'm on my summer hols?!

So if you didn't know already or you've been hiding under a rock for the last week, it's that time of year where I sit here, eager to get any sneak peaks from the CHA show! I'm totally jealous of anyone who manages to go y'know ;D

So how does a gal pass the time wishing she was there? Well she decides to getting around to stuff she said she'd do, but she's never done! So I decided on being super brave and I'm now featured on the big screen!!!!! What movie, you ask? Well I'm not on that big screen, but I have finally answered a few requests and have uploaded a little video I made last night to show you how I make my lil' bows for my projects. How else could I pass the time whilst I sit here jealous of everyone at CHA?! LOL!
So here it is, Aimes comin' at ya (well my voice anyways!) and showing you how to make the most easy, peasy bows ever! Huge credit goes to my very own mum for suggesting this technique to me. Mum, you've saved me many hours of ribbon fiddling with this, THANK YOU!!!!

Now before you criticise, I'd like to point out that this was filmed at night whilst my guy was out (I just know he'd make me crack up if he was around!) and not using the most fancy shmancy equipment! But after a million takes I'd like to think that it at least shows you how I make my bows and that's the main aim of the video, right?!

Enough babbling - Enjoy!


If you can't see the video try viewing it here

So I now expect you all to have the most gorgeous bows on your projects of course *wink*! And as you can see, I then put the bow I made in my video to good use :D

Chair-ish trio close up

Oh man I just ♥ these cards (am I allowed to say that?!)

I've gotta stop now and move onto a different design now though methinks LOL! But seeing as I've made these now, I figured that I could enter them into the Moxie Fab World: Card Style Week challenge for Clean and Graphic Cards. I have to say I think this style is my fave of all and one that I'll never tire of!

Thanks so much for stopping by and for checkin' out my premiere on the big screen - tee hee! Who knows how else I'll spend the time trying not to wish I was at CHA!

Catch ya later!
Aimes
x

Thursday, 24 September 2009

A Tutorial...

Hey!

Well the PC has been set up and plugged in so I'm pleased to say that I can now surf blogland at home and hopefully leave comments on your wonderful blogs to let you know I popped by!

As Chris had to focus on the PC, not a single box containing crafting goodies has been unpacked yet but fortunately I managed to get a little crafty before we boxed up and moved out ;D.

Here's a card I made for a past challenge on the PTI Blog that I forgot to post up here (the challenge was to use our favourite colour - mine being green of course!)This card was made with my little (or not so little now as he towers above me) brother's bday in mind - it's another 'couch surprise card'. I was gonna give him my PTI August GSS entry but as it won, I couldn't bare to part with it LOL! I'd had a few request on how I made it so as I was making this one, I figured I'd show you all how easy peasey it is to make! It makes a fab card for just about anyone !

So without further ado, how to make a 'couch surprise card' (apologies for blurry pics and the crafting chaos in the background btw!)

Step 1
Stamp out your couch and colour (I used a circle nestie to stamp inside and promarkers to colour with directly onto Kraft card - I love colouring onto Kraft! I also added some detail with a white gel pen)
Then using a craft knife, cut across the top of the cushions you'd sit on (this is where the money slides out!)
Step 2
Now to make the pocket that will hold the money. I decided to use vellum as it's thinner than PTI cardstock so will slide easily in and out of the slit in the couch.
I figured it's easier to show you the template I created with the measurements written by the side (in centimetres). It's easy if you start with a piece 14cm x 4.25cm and alter to recreate the following pic. After cutting this out, score down the 1cm flaps and across where the narrow strip meets the wide part.

Step 3
Fold the side tabs inwards first, then stick them to the narrow strip. I do it this way so the back of my pocket remains a smooth piece of vellum without any risk of glue or folded tabs making it get stuck!
As you can see on the pic, the tabs are glued inside the pocket rather than wrapped around the outer sides so the back is tab free (gosh I hope that makes sense!) Step 4
I then stamped my cushion onto cardstock and cut a thin piece of card slightly narrower than the cushion. Apply some thin sticky tape to the top of the reverse side of the cushion and attach the card. The reason I apply it to the top of the cushion is so the cushion sits nicely on the sofa and overhangs on the slit in the sofa.
The strip of card is then stuck to my vellum pocket (the card adds more stability for when the pocket is pulled and pushed - vellum will tend to crumple!)After creating the pocket, test it in the sofa to make sure it moves freely and nothing catches!Step 5
Next, prepare the card blank BUT DON'T STICK IT TOGETHER YET (go on, ask me how I know LOL!) You need a card blank and another layer on top - I've picked kraft as a base and New Leaf as the layer here (scrummy!) but you can choose whatever the occasion suits! Plan where you want the sofa to be, and using a pencil, draw around the circle (or whatever shape your sofa is on!) remember you need enough room for the pocket to hide so portrait is the best orientation for this kinda card!Step 6
Using a craft knife, cut a large gap to ensure your pocket will fit nicely behind this layer. Leave enough of a border to stick down your sofa though. I love that I don't have to be too accurate with this and as no-one sees it, it doesn't matter if it's a little messy!
Step 7
Stick the sofa onto the card, threading the pocket through the gap you've just cut out.
Step 8
Decorate the rest of the front panel (I've wrapped coordinating vellum around the bottom half; drawn around the sofa circle with a white gel pen using the nestie it was cut with; cut another circle with the a sentiment on and added some yummy enchanted evening ribbon) Then add plenty of 3-D foam around the edges of the card, though not in the middle as this will prevent your pocket from working!

Step 9
Put your treat into the pocket (I went with a £10 note but it depends on just how generous you're feeling ;D) and place the pocket back into the sofa.
Then attach the layer to your base card

Step 10

Ta Dah! Couch surprise card complete!

Card with sliding tab down...
...pillow picked up to find a nice treat down the back of the sofa!
Card Recipe
(All PTI Unless Stated)
Stamps: On My Couch, Star Prints
Ink: Memento Black, Fresh Snow
Cardstock: Kraft (from stash), New Leaf, Enchanted Evening, Pure Poppy
Accessories: Enchanted Evening Satin Ribbon, Cuttlebug, Nestabilities, Promarkers, Vellum (from Stash) and a £10 note LOL!

So there ya go - a couch surprise card in 10 easy step! This card totally justifies the purchase of the On My Couch stamp set for me, I did wonder if I'd ever use it but I ADORE it!

I hope somebody found my tutorial kinda interesting or useful....obviously you can alter some of the dimensions for your own requirements! If you do have a go I'd love to see the results!

Oh and btw, my brother (Dan) liked his card (well the money in it anyways!) and even offered to give it me back as he thought I'd given him my winning GSS entry - bless! I soon corrected him though; that special card takes pride of place in a box somewhere at the moment LOL!

Thanks soooooooo much for stopping by and not totally giving up on my blog with it's lack of posts!

Catch ya later!
Aimes
x

Sunday, 1 March 2009

Finally!

Hey!

It's taken me a while but here is a tutorial on brayering; I was planning on doing this sooner but the batteries went in my camera and for once I didn't have any new ones! I hope it's OK, I'm not super at teaching via text and pics, I'm a kinesthetic learner myself!
First things first, I like to work on glossy card for brayering. I find it blends ink fantastically well and is quite forgiving on harsh brayer marks and my mistakes!
I like to stamp my main image first that will be at the forefront, colour it in and emboss with detail clear embossing powder. If you haven't got clear embossing powder don't panic, you could use a masking technique but I find that kinda fiddly and time consuming!

So for my little doll (yup, still lovin' that Hero Arts set LOL!), I stamped her using Memento Black ink. I coloured her in using Letraset Promarkers (Ivory, Pastel Pink & Blush for her skin, Berry Red & Cocoa for her top with Pastel Yellow and Gold for the bottom of her top).
I then coloured over the whole image with a VersaMark pen. When doing this it's best to colour over the light shades first, gradually getting darker. Don't freak out that you've wrecked your VersaMarker like I did the first time - you just need to scribble on scrap paper after to get rid of the colour the pen picks up! Next, add detail clear ep and heat.

Next I tore some scrap paper to create the landscape and placed it over the paper secured with masking tape (Keeping the other piece of torn scrap paper to do the sky later).
Now for some fun brayering to commence! I loaded my brayer with Whispers Ink Savoy Green (I'm desperately trying to use these inks up so I can invest in some new juicy pads!) and rolled away!

To add some more texture and detail I sponged SU! Old Olive ink on top, paying particular attention to the edges and the torn paper line. I don't use fancy sponges, just the kind I can do the washing up with (though obviously not the same sponge for ink and soap suds LOL!) After applying the ink I used a piece of kitchen towel to wipe the ink from the doll I embossed. I find I use more kitchen implements for craft time rather than time in the kitchen!

Using the other half of the scrap paper as a mask for the grass, I then brayered the sky. I didn't actually have a nice juicy blue ink to use so had to use the top half of a Marvy blending ink pad! This was kinda tricky - I must get my hands on a nice light blue - any recommendations?
(Apologies, I took this pic after brayering and moving the mask so I know that there's some grass showing in this pic but I swear that it was covered accurately whilst brayering - the pic is just for demonstration!)

To make the sea and horizon I just placed a straight piece of paper across my sky (keeping the grass mask on too!) and brayered the darker shades of my Marvy Blending Block, sponging Whisper Royal Blue ink towards the horizon line to add detail. As you can tell from the pic, my brayer has had its fair share of ink! Although it's stained this ink never transfers onto my work, I usually use baby wipes (Alcohol-free) to clean it after inking.

It was only at this point I realised my big mistake! I'd forgotten the sun, Oooops!!!! I'm ALWAYS doing stuff like this - I get so into brayering I forget what the end result was supposed to be LOL!
So with another piece of glossy card, I cut out a circle and inked it with Whispers Sunshine ink, sponging with Whispers Butterscotch ink along with SU! Ruby Red ink to give it some detail. (Normally I'd cut a circle out of a post-it note before brayering the sky to create a circle to colour.)

Before I stuck my sun on I decided that I wasn't happy with the sky. Being the perfectionist I am I had to do something about it otherwise it would nag me! I sponged Whispers Azure Seas around the edges of the sky (strange to be using a shade named about the sea for the sky but if it works, go with the flow!)


Finally, I stuck on the sun (along with cursing myself for forgetting about it!) and added detail with a white gel pen to the sea and doll herself. I also used a black pen to draw the birds; that sky was looking pretty empty without them! Then with my Letraset Promarkers I created the shadow under the doll (using shades Ice Grey 2 & Ice Grey 4). When applying the marker I usually dab the ink with kitchen towel to help blend it more. When making a shadow, just think where the light source is coming from and where the shadow would cast itself. I've been known to actually get a torch and an object to work this out when I know my brain isn't up to it!


Now for the hardest part (for me, that is!) getting it to look good on a card! I picked some K&Co paper from the Amy Butler Belle Mat Pad with colours that could be picked out of my scene. I would normally mat and layer the scene more but the size of card (DL size) wouldn't allow for layers this time. So to compensate I added both buttons AND ribbon although I'm not entirely happy with my ribbon. I so wish I could tie gorgeous bows but for me it's always safer to stick to simple knots! Anyways enough of my self-criticism: here's the final piece!


Ta-dah!

I hope you enjoyed reading my tutorial and may even be inspired to have a go at it yourself! Remember: if I can do it, nearly anyone can LOL! I'm also open to any comments, questions or even requests for future posts!

Thanks for stopping by!
Aimes
x

Copyright/Disclosure

I am on various design teams and receive free product to use and promote. I geniunely love the products of the companies and all opinons are honest and my own.

I'm flattered if I've inspired you and you want to CASE anything of mine, but please don't enter it for commercial publications or competitions.
Thank You!
All designs, text, and photographs on Crafting Confessions are ©2009-2016 to Amy Gray unless stated otherwise.