Saturday, 31 August 2013

Bridal Bloom Blog Hop!

Congratulations
Hey!

Welcome to a very special blog hop to celebrate a special lady on her special day! This is a bridal shower, blog hop stylee! The sweet Chaitali (of Iron Craft fun fame) suggested that we celebrate the owner of Uniko Studio, Bev's, forthcoming nuptials in this fun way and we, the Uniko Studio DT, jumped on board straight away!

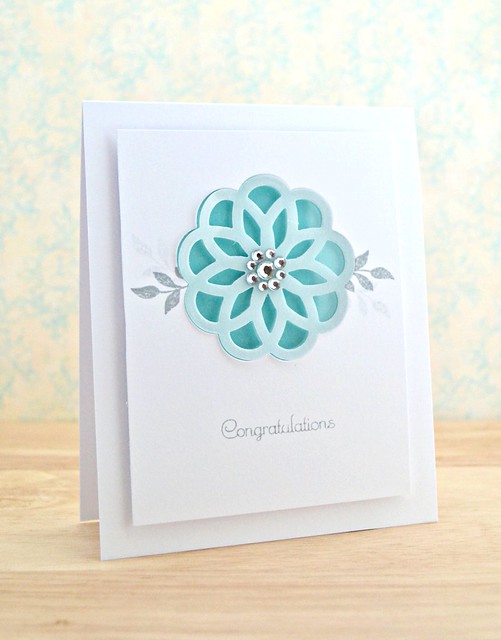
We decided to keep the theme of the blog 'beautiful bridal blooms'. Well you know me and my infatuation with the graphic flower die; me and that die were meant to be together! So it got yet another crank through my Cuttlebug for this special card. :)

I couldn't resist adding a panel of Hawaiian Shores card behind the aperture I cut with the die. Not only does it add a splash of colour to the design, it also symbolises the destination of Bev's wedding: Hawaii! Lucky thing!

tips and tricks
  • I originally wanted to place a mega-sized piece of bling to the centre of my flower but didn't have anything big enough. (Note to self: purchase mega sized bling!) So I gathered a few different sizes of bling and arranged them in this little circular pattern. 
  • To add a bit more depth to the leaves around the flowers I stamped them twice on each side without reinking my stamp (aka Generation Stamping). 
Now this bridal blog hop would mean so much to the bride-to-be herself if you popped on across and left a sweet message for her. And it would be fabulous if you could join in the hop and see what we've created to surprise Bev with:

Uniko Studio Blog (Leave Bev a message here!)
Aimes (You are here!)
Amber
Chaitali
Erika
Gayatri
Nicki
Ren-Yi
Stacey
Taheerah

Bev, no doubt you are giddy with excitement in the sweet sunshine right now. If you do read this before your big day - I want to wish you and your guy the most wonderful day ever! Sending you big hugs, friend! xxx
Signature2


Products Used


Tuesday, 27 August 2013

Ahoy!

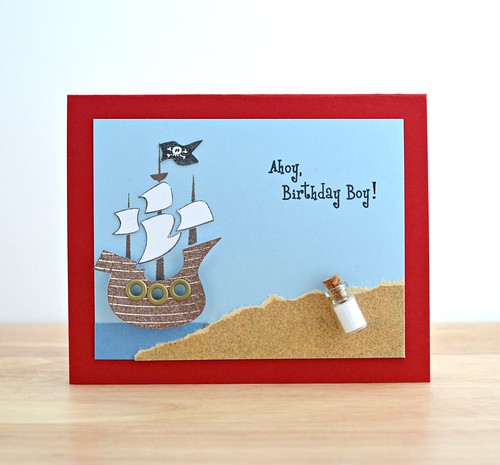
Ahoy Birthday Boy 
Hey! (Or should that be, Ahoy!?) :)

Well I'm back to reality after an amazing adventure in Italy. The huge mountain of washing is being tackled, my guy is back to work (I'll be back next Thursday - eeek!), and my taste buds are adjusting back to reality food after a week of gourmet Italian feasts! (I won't bore you with holiday snaps here, but if you're interested I've shared a few fun pics via Instragram)

While I was away, it was my nephew's birthday so cue another birthday card whipped up by one of my all time favourite sets to use for little guys, Clearly Besotted Stamps Ahoy Matey! (Which now has coordinating dies - sweet!) Man, I hope my nephews don't ever tire of pirates....I can see them getting pirate cards from me well into adulthood! Ha!

This card incorporates some texture in the form of sandpaper. Seeing as I'm unlikely to use the stuff for DIY projects, it seemed apt to use it for a beach/desert island.

tips and tricks
  • Don't be afraid to use non-cardmaking supplies on your projects. DIY supplies can make great embellishments for guy cards!
  • Texture is always a winner with cards for children! Sandpaper made a perfect beach/desert island but experiment with other materials such as flock and felt for a softer feel if you're not keen on the roughness of sandpaper.
  • Just to add an extra finishing touch, I did indeed put a message in that little bottle/vial. If you use a larger vial, you may consider rolling up some money for some real treasure!
Well it's more a case of laundry room ahoy today, rather than treasure ahoy! Mind you, you never know what treasures one may find whilst emptying pockets.....

Thanks so much for stopping by today - your visits (whether they be directly here at the blogerooo, via email or via some other random feed) are always, always appreciated!

Signature2


Products Used


Tuesday, 20 August 2013

A 'fab' project...

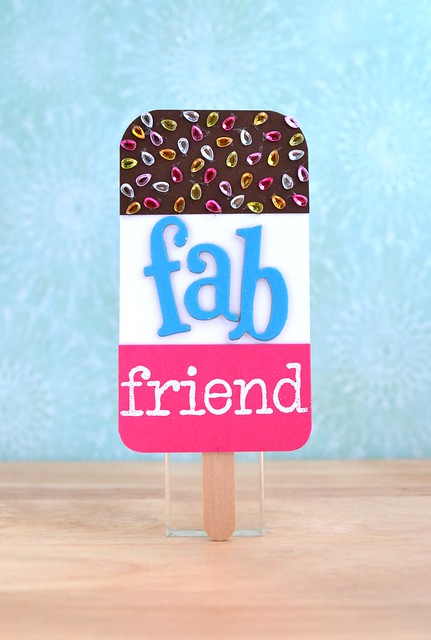
Fab friend
Hey!

So roll on scheduled post number two of the week. By now I'm hoping that I've a good dose of gelato and I'm still sunburn free!

Today's 'fab' creation is a 'sweet' reminder about our challenge on A Passion for Papertrey. We want you to be inspired by something sweet!

Now if you don't 'get' this project, let me explain. For my sweet inspiration I took a literal, retro approach and went back to my childhood. I loved fab ice lollies as a kid (Pssst - I still do now!) and was inspired to recreate one. If you remember them/still have them did you have to eat them the same weird way I did? I had to peel off the chocolate layer first, then scoff all the cream layer and finally eat the ice layer. Now you can't eat this version, but it does have a magnet attached to the reverse so it'd jazz up your fridge (or freezer I guess!) :)

tips and tricks
  • To create the sparkles, I snipped out the tear shaped gems of a patterned bling design. Don't be afraid to cut up patterned bling to make it suit your project!
  • To add colour to my sparkles/sprinkles I used a Promarker on the clear gems. Easy! I purchase all my bling in clear and colour it to have perfectly coordinating bling no matter what.
Now come on and be inspired by something sweet yoruself. You don't need to take a literal approach to the inspiration - just be inspired by something sweet in any way and get creative! One randomly selected peep will win a $5 Papertrey Ink gift certificate!

Ciao, peeps! :)

Signature2


Products Used
N.B The American Craft Thickers are no longer in production in that style. I've found them here in green though! :)


Copyright/Disclosure

I am on various design teams and receive free product to use and promote. I geniunely love the products of the companies and all opinons are honest and my own.

I'm flattered if I've inspired you and you want to CASE anything of mine, but please don't enter it for commercial publications or competitions.
Thank You!
All designs, text, and photographs on Crafting Confessions are ©2009-2016 to Amy Gray unless stated otherwise.