Saturday 31 August 2013

Bridal Bloom Blog Hop!

Congratulations
Hey!

Welcome to a very special blog hop to celebrate a special lady on her special day! This is a bridal shower, blog hop stylee! The sweet Chaitali (of Iron Craft fun fame) suggested that we celebrate the owner of Uniko Studio, Bev's, forthcoming nuptials in this fun way and we, the Uniko Studio DT, jumped on board straight away!

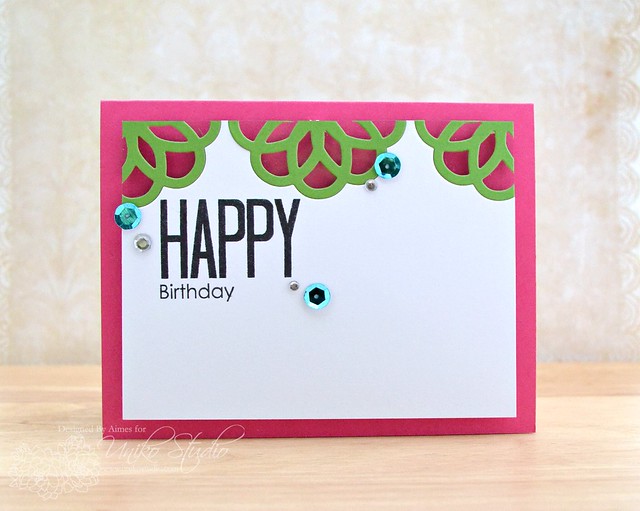
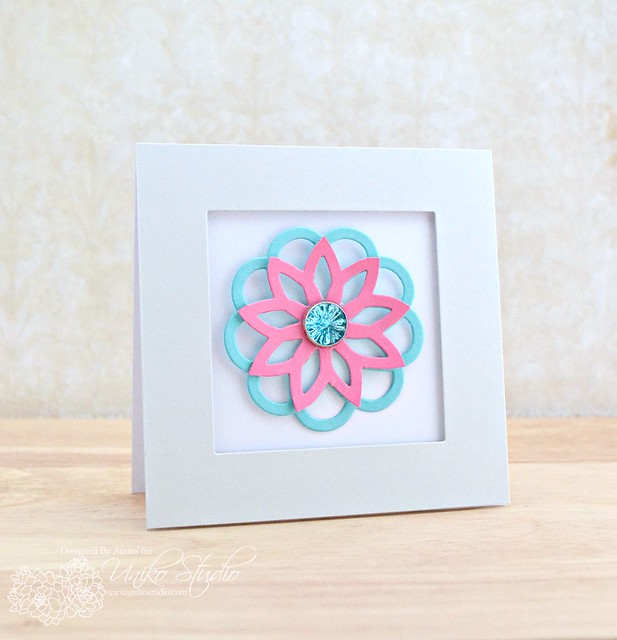
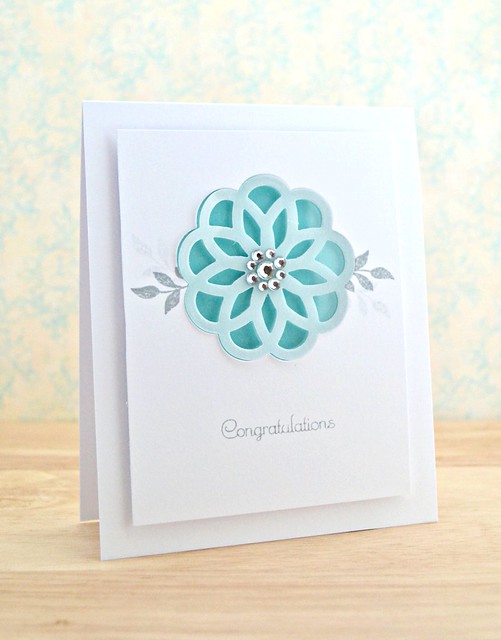
We decided to keep the theme of the blog 'beautiful bridal blooms'. Well you know me and my infatuation with the graphic flower die; me and that die were meant to be together! So it got yet another crank through my Cuttlebug for this special card. :)

I couldn't resist adding a panel of Hawaiian Shores card behind the aperture I cut with the die. Not only does it add a splash of colour to the design, it also symbolises the destination of Bev's wedding: Hawaii! Lucky thing!

tips and tricks
  • I originally wanted to place a mega-sized piece of bling to the centre of my flower but didn't have anything big enough. (Note to self: purchase mega sized bling!) So I gathered a few different sizes of bling and arranged them in this little circular pattern. 
  • To add a bit more depth to the leaves around the flowers I stamped them twice on each side without reinking my stamp (aka Generation Stamping). 
Now this bridal blog hop would mean so much to the bride-to-be herself if you popped on across and left a sweet message for her. And it would be fabulous if you could join in the hop and see what we've created to surprise Bev with:

Uniko Studio Blog (Leave Bev a message here!)
Aimes (You are here!)
Amber
Chaitali
Erika
Gayatri
Nicki
Ren-Yi
Stacey
Taheerah

Bev, no doubt you are giddy with excitement in the sweet sunshine right now. If you do read this before your big day - I want to wish you and your guy the most wonderful day ever! Sending you big hugs, friend! xxx

Signature2


Products Used


Tuesday 27 August 2013

Ahoy!

Ahoy Birthday Boy 
Hey! (Or should that be, Ahoy!?) :)

Well I'm back to reality after an amazing adventure in Italy. The huge mountain of washing is being tackled, my guy is back to work (I'll be back next Thursday - eeek!), and my taste buds are adjusting back to reality food after a week of gourmet Italian feasts! (I won't bore you with holiday snaps here, but if you're interested I've shared a few fun pics via Instragram)

While I was away, it was my nephew's birthday so cue another birthday card whipped up by one of my all time favourite sets to use for little guys, Clearly Besotted Stamps Ahoy Matey! (Which now has coordinating dies - sweet!) Man, I hope my nephews don't ever tire of pirates....I can see them getting pirate cards from me well into adulthood! Ha!

This card incorporates some texture in the form of sandpaper. Seeing as I'm unlikely to use the stuff for DIY projects, it seemed apt to use it for a beach/desert island.

tips and tricks
  • Don't be afraid to use non-cardmaking supplies on your projects. DIY supplies can make great embellishments for guy cards!
  • Texture is always a winner with cards for children! Sandpaper made a perfect beach/desert island but experiment with other materials such as flock and felt for a softer feel if you're not keen on the roughness of sandpaper.
  • Just to add an extra finishing touch, I did indeed put a message in that little bottle/vial. If you use a larger vial, you may consider rolling up some money for some real treasure!
Well it's more a case of laundry room ahoy today, rather than treasure ahoy! Mind you, you never know what treasures one may find whilst emptying pockets.....

Thanks so much for stopping by today - your visits (whether they be directly here at the blogerooo, via email or via some other random feed) are always, always appreciated!

Signature2


Products Used


Tuesday 20 August 2013

A 'fab' project...

Fab friend
Hey!

So roll on scheduled post number two of the week. By now I'm hoping that I've a good dose of gelato and I'm still sunburn free!

Today's 'fab' creation is a 'sweet' reminder about our challenge on A Passion for Papertrey. We want you to be inspired by something sweet!

Now if you don't 'get' this project, let me explain. For my sweet inspiration I took a literal, retro approach and went back to my childhood. I loved fab ice lollies as a kid (Pssst - I still do now!) and was inspired to recreate one. If you remember them/still have them did you have to eat them the same weird way I did? I had to peel off the chocolate layer first, then scoff all the cream layer and finally eat the ice layer. Now you can't eat this version, but it does have a magnet attached to the reverse so it'd jazz up your fridge (or freezer I guess!) :)

tips and tricks
  • To create the sparkles, I snipped out the tear shaped gems of a patterned bling design. Don't be afraid to cut up patterned bling to make it suit your project!
  • To add colour to my sparkles/sprinkles I used a Promarker on the clear gems. Easy! I purchase all my bling in clear and colour it to have perfectly coordinating bling no matter what.
Now come on and be inspired by something sweet yoruself. You don't need to take a literal approach to the inspiration - just be inspired by something sweet in any way and get creative! One randomly selected peep will win a $5 Papertrey Ink gift certificate!

Ciao, peeps! :)

Signature2


Products Used
N.B The American Craft Thickers are no longer in production in that style. I've found them here in green though! :)


Sunday 18 August 2013

More patterns than you could shake a stick at!

happy anniversary
Hey!

It's Sunday and this is the first of my scheduled posts for a week - fingers crossed it's worked! Hopefully I should now be scoffing some gelato by now in Italy. :)


So it's not only Sunday, it's the 18th of the month which means it's time for a new Uniko Studio challenge! The challenge this month is a sketch challenge and Uniko Studio DT teamie Gayatri has whipped up this sketch for us to follow:

I hope you can see that I followed the sketch almost identically. I had an occasion in my head to stamp for (My brother and SIL's anniversary) before I jetted off on holiday so the I made the occassion and the challenge work together. :)

The tiny hearts are stamped from Flower Fusion #3 on to Pure Poppy card and cut out. I added some doodles with my white gel pen to decorate them. The big heart is a die cut spare I had and I decorated it with Background Builders: Chevrons.

I was originally going to go plain and white with this card, but I'm still learning to embrace patterns and colours. Too much pattern on this? It didn't give me a headache to look at it....that's usually a good sign! Ha!

I hope you can join in the fun with us. Here are the challenge deets:
  • You have until September 14th 09:00 UK time, to link your card up below
  • Winners will be announced by September 17th
  • Please add the Uniko Studio Challenge badge & link back to the challenge 
  • If you don't have a blog to link back to the challenge, don't worry. Just use "USC"+ as your tag. For example, for our first challenge use "USC1"
  • Showcase any Uniko Studio product: clear stamps, dies, digital pattern paper, digital cut files, or digital stamps. If you haven't purchased any Uniko Studio products, fear not. Plenty of freebies here.
The Prizes!
  • A £10 Gift Certificate to the Winner & Guest Design Team spot on the blog for the next challenge
  • Top Three Spotlight
Thanks so much for stopping by here today. Fingers crossed the rest of my scheduled posts work!

Ciao, peeps! :)

Signature2


 Products Used
N.B The patterned card base is by a.muse and is no longer available :(


Tuesday 13 August 2013

Pretty Peg

Pretty Peg
Hey!

Today I've got a little project for you that surprised even myself. It wasn't planned, and was simply a result of playing around. No stamping, no card and most surprisingly of all a project that featured fabric! Those of you who know me, will know that sewing is not a strong point of mine. But if I can find a way around it, I will! *wink*

I was busy die cutting some sweet flowers for another project and whilst rooting through a drawer for something, I came across this sweet square of polka dot fabric given to me by my mum. I remember saying to her "I'm sure I can do something with it...." oh so long ago!

So my eyes looked at this pretty fabric, and then to the Cuttlebug and back to the fabric. Eureka! Cue a very pretty polka-dot flower. Flower complete. What to do with it? Put it on a card? Attach it to a hair-clip? Make a brooch out of it? Nope. Attach it to a peg of course! I also attached a magnetic strip to the back of it. It would look so pretty on the fridge....if I had a fridge with a magnetic front!

For now though, this sweet peg is perched on my desk lamp and is keeping a few papers safe. I think it's made its home there. :) Edited to add: it's not attached anywhere near the bulb! My lamp is much bigger than it sounds! Thanks for the warning, Caryn!

tips and tricks
  • To prevent frayed edges when die cutting thin material, place the material on some card to add an extra layer to your die cutting sandwich.
  • This pretty polka dot material is very thin, so I die cut another flower from blue felt to place behind it for extra stability.
  • Don't spend money on expensive pegs. Buy cheap wooden ones and customise them with acrylic paint (and don't forget, you can stamp on them too!). In order to paint the pegs with even coats, dismantle them and put them back together once painted.
And do you know the sweetest thing about this project? Not a single stitch was involved/harmed in the process. Thank goodness for glue dots! Ha!

So there you have it. A die is not only for a coordinating stamp set! And seeing as I've been busy with the dies, I'm going to enter this sweet peg into the Simon Says Stamp Monday Challenge: Make the Cut. :)

As always, thank you for popping by here today!

Signature2


Products Used


Sunday 11 August 2013

That die. Again.

Happy Birthday
Hey!

Woo hoo! The day is here! It's release day over at Uniko Studio and all of the wonderful products that have been showcased over the past few days are available for your crafting pleasure! :D

We're celebrating the fabulous release with a good ol' fashioned blog hop. You should have hippity hopped over here from the Uniko Studio blog - if you haven't be sure to start there and hop along; one lucky commentor will win the entire August release!

Now today's card features that cool graphic flower die again. What can I say? I just love it so much! I created this almost lace border effect with it by die cutting half of the shape repeatedly. I like that it all sits flush against the white card stock and has an almost floating effect. Is it magic? Nope. It's the wonders of acetate. Mainly placing a layer of acetate behind a panel of cardstock and attaching my die cut shapes to it. Simple!

tips and tricks
  • When it comes to creating a border, I like to start in the middle first to ensure that the design is equally balanced on each side. This simply meant that I die cut half of the graphic flower die from the top centre of the white card before cutting it again either side.
  • Acetate is the magic when it come to creating floating designs with ease. I could easily cut the full graphic flower from the middle of a piece of card, place acetate underneath and slot a separate die cut graphic flower in the aperture created from the first die cut. 
  • I adopted the 'gallon, quart, pint' design princple for this design. A good amount of pink, slightly less green and even less blue. It helps to balance the design.
Now I won't keep you here as there's hopping to be done! Next on your tour of Uniko Studio goodness is Amber. Be sure to comment as you hop to be in with a chance of winning the entire August release!

Thanks so much for hippety hopping by today!

Signature2

Saturday 10 August 2013

Hello {love} :)

This is my second post for today. Please scroll down to check out my Uniko Studio sneaky peek or click here - thanks! :)

Hello
Hey!

Ready for a new challenge, Clearly Besotted Stamps stylee? Yup, it's time to dig out your card, inks and CBS stamps to join in the fun with us!

This month is a colour challenge. We wanna see projects that use all or some of the colours in this scrummy pic:


Image source: Design Seeds

I opted to use the bubblegum pink, green, pinky-red and I threw in a good dose of white for good measure. Well, I can see white in the gingham pattern anyways *wink*

Random funny tidbit: when I showed this card to my guy, he responded by saying it was very 'Derbyshire'. Confused, I asked him what he meant. "Well when you look at it literally, the card says "Hello, Love". I do love that mind of his. :)

Still confused? Well where I come from, we use the word 'love' as a term to call pretty much anyone by (that goes for the word 'duck' too!) There are obvious people you wouldn't call 'love' and 'duck' but you certainly hear it in the older generations. :)

tips and tricks

  • The mini-triangle is from the set Sky's The Limit - it's part of a kite. Look at the smaller stamps in your sets and see what patterns you can create with them.
  • This card will fit perfectly into Papertrey Ink's Seed Packet Die. I love to use that die to create mini envelopes from my patterned paper stash. They do say good things come in small packages.... :)
Seeing as I've used that little triangle stamp, I'm also going to enter this little card into the Moxie Fab Trendy Triangles Challenge, and the Simon Says Stamp Wednesday Challenge - Simon Says...Triangles. :)

Now if you're new to Clearly Besotted Stamps, firstly, where have you been?! Ha! Secondly, don't fear! You can still play along as Stephanie has some free digi stamps you can use (change the colours of them using basic imaging software, or an online site such as PicMonkey).

Oh and there's the little thing of a whopping Four CBS STAMP SETS up for grabs for one lucky peep! F.O.U.R! :D

To get the full deets of the challenge and to check out what the super-duper CBS team have inked up to get your mojo ticking, pop across the the CBS Blog.

Hope you can play along with us! :)

Signature2


Products Used


My new favourite die... :)

graphic flower die
Hey!

Hooray for the weekend! I'm still ever grateful for the weekend even though I'm on my summer holidays as it means everyone else around me is away from work too! We'll be spending ours mainly holiday shopping as we're escaping the real world in a couple of week's time and we've got our newly engaged friends visiting to discuss wedding stationery (maybe I should start thinking about my own?!?!).

But anyways, enough about my weekend plans, let's discuss today's card. It features the die that I've been dying for from Uniko Studio. Yes, finally, the graphic flower die will hit the store come Sunday August 11th! I'm telling you now, that this die is so graphic and fun. It makes me smile just cutting that pretty shape out. Lots. :)

I wanted to let the die do the talkin' on this card so cue a simple, sentiment-less card that I can use for a variety of occasions. To add extra interest, I die cut the graphic flower shape from pink cardstock, trimed the design into another flower shape and layered on top of my blue flower. A big jeweled brad holds it all together (finally getting through that brad stash of mine!)

tips and tricks

  • I used Spellbinder's Square Nestabilities to whip up this frame for my card in a matter of seconds. Other shapes will work as well too - experiment! 
  • Don't take the shape of a die on face value - have fun seeing what other shapes you can create. 
  • I'm a believer that not all cards need to have a sentiment on the front. I'll keep this card safe and when an occasion arises for it, I'll stamp my sentiment on the inside. :)
The graphic flower die comes as part of a collection so if you wanna see more, then see what the rest of the Uniko Studio DT whipped up with the set:
 Right, I'm off to make a list of things I need to buy for our holiday. Mainly suncream! Ha!

Signature2


Friday 9 August 2013

Mega masking!

With Love On Your Special Day

Hey!

Hooray for Friday! Hooray for more Uniko Studio sneaky peeks of the August release! I hope that you've enjoyed what you've seen so far. All products are available for purchase from Sunday August 11th!

Today's card features the technique of masking. A whole lot of masking. Using a sweet flower from the set Flower Power #3.  I love this graphic style little Chysanthemum and I couldn't resist using it to build a pattern.

The sentiment(s) feature from Flower Power #3 too and I love the delicate swirly font - so fun!

tips and tricks
  • It's really handy to create a few 'masks' of stamps by stamping them on the sticky part of a Post-It note and keeping them safe with your stamp set after using them. 
  • I originally wanted to stamp the solid image of the flower to create an ombre effect, but the lack of coloured inks in my supply made me change my mind and use markers instead. Stamping the outline flower in a grey ink rather than a black ink, keeps the design soft.
  • Mix and match sentiments from the same set to achieve custom sentiment. On this card I used three different sentiments from the same set!
That's all from me today, but be sure to check out how the rest of the Uniko Studio DT inked this set up:
Don't forget there are mystery prizes up for grabs that will be announced on the Uniko Studio blog on August 11th. There are lots of ways to win, by commenting on the blog or a DT member blog during the countdown to release, FacebookTwitter and Pinterest.

As always, thank you so much for stopping by here today. I hope you have a great weekend!

Signature2


Wednesday 7 August 2013

Jingle Bells? In July?!

Happy Christmas
Hey!

Hooray for Wednesday! Apart from having my mum and brother visit today, and playing football later, it's also time for some Uniko Studio sneaky peeks!

I know what you're thinking. Christmas? In July? But stick with me, I can explain! :)

The Uniko Studio DT are featuring the fabulous new set, 'Background Builders: Flower Power' (Available for purchase from August 11th). Now for me, as soon as I saw one particular stamp, I was overwhelmed with visions of cozy winter jumpers with cool nordic-style patterns and before you knew it, my mind had jumped to Christmas. Oh I was *so* in that cozy sweater with a glass of mulled wine by an open fire!

So cue the Christmas card. Are you still with me? Just goes to show how versatile this set is, right? *wink*

tips and tricks
  • To add an extra warm, snuggly feeling to my card, I applied Vintage Photo Distress Ink to the card base and my focal panel.
  • For extra texture, I embossed the card base using my most favourite impression plate ever and a paper distresser on my focal panel to ruffle the edges. If you don't have a paper distresser, scissors will do the same job! It's easier to apply distress ink to a piece of card first, and then to distress the edges with a tool/scissors.
  • Sentiments don't have to sit vertically on a design. Have fun mix and matching sentiments from different sets and stamping them at different angles! 
Edited to add: Oooh this card fits in perfectly with the Moxie Fab World Holiday Card Challenge so I'm linking this card up to it. :)

Be sure to check out what the rest of the Uniko Studio DT whipped up with this great set - I'm pretty sure it'll only be here that features jingle bells today!
As always, thank you so much for stopping by today. Stay tuned for more sneaky peeks of Uniko Studio's August release....!

Signature2


Sunday 4 August 2013

Teasing - CBS Stylee! :)

hello
Hey!

Happy weekend - well, what's left of it anyway! It's a super-duper-happy weekend at Clearly Besotted Stamps as the teaser time of August's release is still in full flow. I'm here today to tease (in a nice way of course!) with a glimpse two sets to be released on August 5th (tomorrow!). 

Fancy florals (with coordinating dies might I add - *squeal*!) is a fabulous, versatile flower set that feature many different flowers and sweet button centres. I can totally see myself inking up the buttons of this set without the flowers too! And I'm telling you now, those dies are great with the stamp set and even without - I have a future project for that little tidbit later though....:)

Many Messages is a set that I know will live on my desk as it features so many sentiments, in so many fabulous styles that I'll probably hardly reach for another sentiment set again!

I think today's card is pretty self explanatory in what I've done. I simply stamped and die cut the sweet flower, leaves and button centre first and added a fun 'HELLO' sentiment from Many Messages. Simple.

tips and tricks
  • I've added a little more interest to the flower on my card by gently coaxing the petals towards me. It helps if you find something round, like a pen, to mould the petals around to avoid any big crease marks.
  • The centre of the flower is a button, but don't be deceived in thinking that's the sole purpose of a button stamp from a flower set. The button stamps can be used as sweet embellishments on their own.  
And as you should know by now, I'm a sucker for Glossy Accents so I smothered that sweet button/flower centre in the good stuff! 
HELLO (close up)
Be sure to check out the CBS blog for more teasing before the big release day tomorrow! :)

Signature2


Friday 2 August 2013

Just the type for my guy...


Apologies that my picture wasn't showing up earlier - oops! Thanks to those who let me know, hopefully you can see it now. Sorry! 

my type
Hey!

Happy Friday! I can't believe the weekend is coming already, although I'm totally ready for it after helping to run a summer school. I don't know how primary school teachers do it - those younger students have so much energy! LOL!

But you're here for a card right? That's the deal. And I'm sorry I've been zapped of creative energy and time to get my blogeroo back on track, but from today I think I'm getting organised. And it's a good job too as it's teaser time over at Clearly Besotted Stamps. Stephanie is releasing 8 new stamp sets and 7 new die collections! It's an amazing release!

Today's card gives you a sneaky peek of a new set (available from August 5th) called, 'Just my Type'. It feature a cool, vintage typewriter and lots of sentiments of your choice that fit perfectly into the paper in the typewriter. This is totally a card that will appeal to my guy - he has a love for vintage items, and we even have one of these typewriters on display in our living room.

tips and tricks
  •  I managed to squeeze two separate sentiments from the stamp set on to the paper in my typewriter. I like to think that the 'XOXO' emphasises the love conveyed in the original sentiment. :)
  • I added extra dimension to the keys of the typewriter using Glossy Accents. You can run your fingers over the keys of the typewriter and really 'feel' them! :)
  • The red heart has been smothered in Glossy Accents too, and gives the card a pop of colour. It also helps to balance the focal-point-stamping in the bottom half of the white strip of card.
Be sure to check out more over at the CBS blog - you're in for a real treat with this month's release! Oooh and be sure to check out the Clearly Besotted Stamps Facebook page as there's a few extra sneaky peeks over there too! :)

Signature2


Copyright/Disclosure

I am on various design teams and receive free product to use and promote. I geniunely love the products of the companies and all opinons are honest and my own.

I'm flattered if I've inspired you and you want to CASE anything of mine, but please don't enter it for commercial publications or competitions.
Thank You!
All designs, text, and photographs on Crafting Confessions are ©2009-2016 to Amy Gray unless stated otherwise.