Saturday 26 October 2013

Snowflakes + Sparkles

Snowflake
Hey!

Happy Saturday! Happy weekend! Happy release day @ Uniko Studio! :D

That's right, all the sneaky peeks that we've been sharing this past week are now revealed in their full glory for you to admire and purchase! Please check out the full release here and deets here.

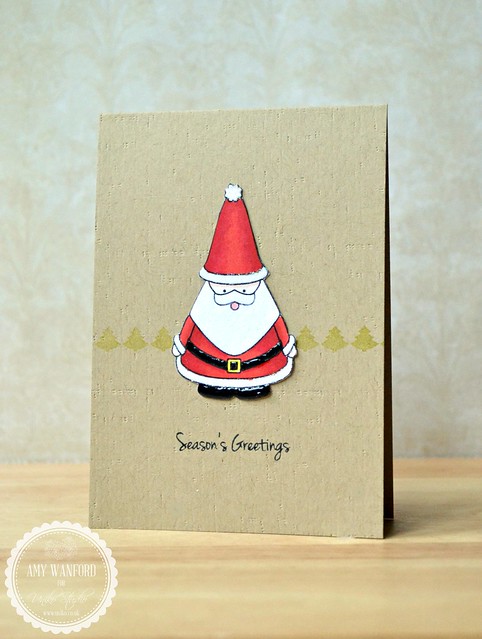
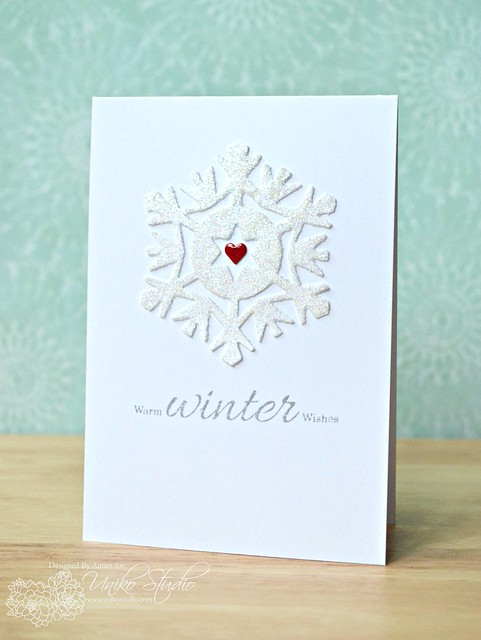
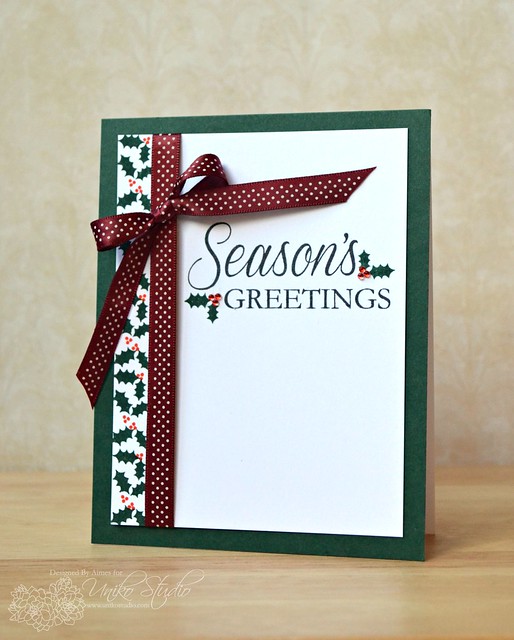
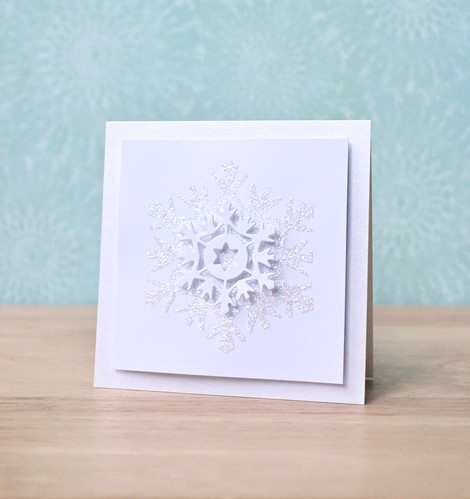
For my final card of the release, I couldn't resist playing with snowflakes again. I love white-on-white creations; there's something so pure and beautiful about them. And when playing with snowflakes, you've gotta add sparkles right? *wink*
tips and tricks
  • To achieve the sparkly snowflake, I used the negative die cut of the snowflake as a stencil from this card and applied sparkling embossing paste over it. 
  • Not got sparkly embossing paste? Then why not apply glitter to wet embossing paste (a tip courtesy of the queen of embossing paste herself, Debby Hughes. Thanks, Debby!
  • Designs can look lost on a white-on-white design so texture and dimension is important. On my design I used shimmer card to match my sparkly snoflake on regular white card, and added dimension by popping up the smaller die-cut snoflake on foam pads.
  • I don't have teeny-tiny foam pads for that teeny-tiny snowflake, but it's super easy to chop up my foam pads into teen-tiny ones. Problem solved. :)
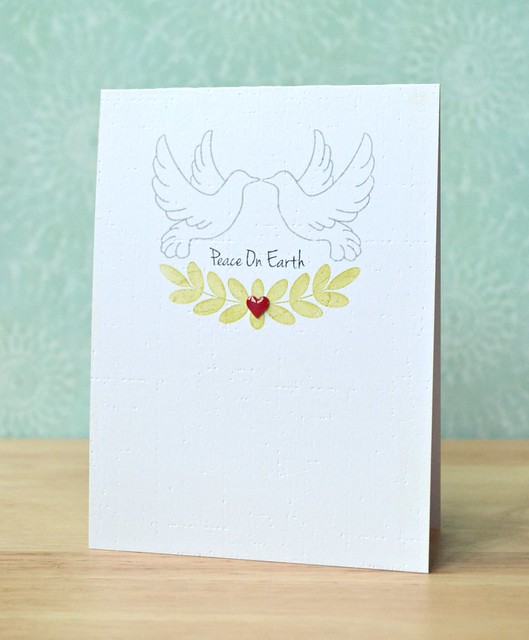
  • I couldn't make a sentiment work on this design without feeling like I'd ruin the pure, crisp, white feel of it. Not every card has to have a sentiment. :)
I have a feeling that these snowflakes are going to make a regular appearance in my holiday crafting, as well as the rest of the Uniko Studio release. Check out the full release and the rest of the Uniko Studio DT for a chance to win the whole release for youreself!

That's all from me today - and for this week! Thank you so much for sticking around and visiting this little corner of Blogland. I'm off for a week now (yay!) so I'm off to tackle my very long to-do list...Wish me luck!

Signature2

Products Used

Friday 25 October 2013

Another ho,ho,ho-liday card...

Season's Greetings
Hey!

Hooray for Friday! Today marks a training day for me at work and nearly the start of the half term holidays - woo hoo! Another reason to celebrate today is that it's the final day of the Uniko Studio sneak peeks and all the products will be available to purchase from tomorrow! :)

If you've missed the fun of the peeks this week you can check them out here, here, here and here. (Once again, said in my best air stewardess voice with accompanying actions *wink*).

I think Bev of Uniko Studio has saved the sweetest and cutest set for last. She says that she doesn't do 'cute' but this set begs to differ. Jolly Christmas is such a sweet set that features Saint Nic himself, a sweet tree and great sentiments. I mean c'mon, how could I not resist inking up Santa? He's adorable!

tips and tricks
  • To help 'ground' Santa and not have him appear to be floating, I stamped a subtle line of trees from Background Builders: Christmas.
  • I added a lot of dimension to santa by giving his fur trim some sparkles (Glitter), his beard some texture (Fluff), and his boots and belt some polish (Glossy Accents).
Here's a close up of Santa. I wish you could feel just how fuzzy his beard is! :)

 Season't Greetings Santa Close Up
Check out the Uniko Studio blog for more deets on this super-sweet set. And of course, be sure to check out the Uniko Studio blog for the full release reveal tomorrow - it's a great one!

Thank you so much for checkin' in today; whether you've just tuned in today or have been here all week, every visit is very much appreciated.

Signature2


Thursday 24 October 2013

Peace (& Symmetry)...

This is my second post for today. Please scroll down to check out my CASE Study card - thanks! :)
 peace on earth
Hey!

Welcome back to day 4 of the Uniko Studio sneak peeks. If you've only just joined the sneak peek party, catch up on previous peeks here, here, and here (Said in my best air stewardess voice - ha!)

Today we get to share a sneak peek of the stamp set, 'Peace on Earth'. I went for another quick, easily stamped, one-layer card to show case this set. In fact, I've nearly used every image stamp in the set (I'm giving you a little more than a sneak peek here methinks!). 

tips and tricks
  • A key design point of this card is symmetry. Everything apart from the sentiment works on  a vertical line of symmetry. It keeps the design as a whole balanced.
  • I stamped the doves in grey to emphasise the peaceful feel of them. It also helps my sentiment stamped in black to stand out more.
Be sure to pop across to the Uniko Studio blog for more of a peek at this sweet set. Although I've nearly given away all of the images in this set, there's a few more and a ton of lovely sentiments in that gorgeous font. :)

So. Fed up of me yet? Hope not as I'll be back again tomorrow with another ho, ho, ho-liday card for the final day of sneak peeks before everything is available for purchase. *wink*

Signature2

Wednesday 23 October 2013

Reverse Embossing Paste....

Warm Winter Wishes
Hey!

Welcome back again to the Uniko Studio sneak peeks. If you missed it, be sure to catch up on Day 1 and Day 2's sneak peeks. All products introduced this week will be available for purchase from October 26th. :)

Today we're getting a little cooler, a little frosty....no, I'm not giving you the cold shoulder, but showing a peek of a snowflake themed stamp set and die collection.

Stunning Snowflakes is a really pretty snowflake set. The Snowflake Dies are graphic in comparison to the set, but I wanted to show with today's card that you can pair them both to work together nicely.

tips and tricks
  • I used sparkle embossing paste on a die cut snowflake to make it super sparkly! I guess the paste isn't only for use with stencils....!
  • To emphasise the sentiment, I couldn't resist adding a heart (covered in Glossy Accents of course) to the centre of my snowflake.
  • The pop of red from the heart helps to draw your eye to the super sparkly snowflake. Trust me, it sparkles so much more when you see it for real! 
Be sure to pop across to the Uniko Studio blog for more peeks of this lovely stamp set and die collection!

Time to dash once again, but I'll be back tomorrow with yet more sneaky peeks.

Thanks so much for stopping by today!

Signature2


Tuesday 22 October 2013

Another holly-day card...

Season's Greetings
Hey!

Welcome back to the Uniko Studio sneaky peeks this week. In case you missed it, you can catch the first sneak peek here.

Today we're sharing a sneak peek of another set in the series of Background Builders and you guessed it, it's Christmas themed (although I see me using stamps from it all year-round!). Background Builders: Christmas has a variety of border stamps for your inking pleasure. I focused on the holly background stamps for today's card. I say 'stamps' because Bev has cleverly designed the holly border as a two step stamp. No need to fussy ink up those berries and leaves, the job is done in two simple stamps! So clever, so easy, so perfect when it comes to Christmas stamping! :)

I paired up the Background Builders: Christmas set with a couple of sentiments from the new, All Occasion Sentiments #4 set, (See yesterday's post for another sneak peek of that set). 

tips and tricks
  • Don't think that a border stamp can only be used for a border. I inked up one set of holly leaves on the border stamp and used it to accent my sentiment. It makes a sweet, tiny accent to holiday cards.
  • No red ink? No problemo! You can always decorate your holly with gems. I did this to the holly surrounding the sentiment and coloured my originally clear gems red with an alcohol marker.
  • Design Tip: The little sprigs of holly around the sentiment and bow create a visual triangle that frames the sentiment. It helps to keep your eye flowing around the design.
Pop across to the Uniko Studio blog for more peeks of the Background Builders: Christmas set.

Right, I'm keeping it super short and sweet today as I'm sure if I babble you'll be sick of me by Friday! Ha!

See you tomorrow for more sneak peeks!

Signature2


Products Used
The stamp sets used are not available for purchase until October 26th. I'll add them to my list of supplies once they're released for purchase.

Monday 21 October 2013

Stamp Surgery!

Merry & Bright
Hey!

Happy Monday! It's a new week and let me warn you now: you're going to be seeing a lot here on the blogeroo. I've got posts scheduled every day this week as I'm sharing some sneak peeks of new Uniko Studio goodies available for purchase from October 26th. ♪It's beginning to look a lot like Christmas ♪ here this week...!

Today's sneak peek is a set that I know will be a staple supply in my Christmas stamping: All Occasion Sentiments #4. This set features a variety of holiday-themed sentiments in a variety of fonts. It was font-love at first sight with the 'Merry & Bright' sentiment. It just begged to be inked up. And not inked up in any old ink. Oh no. How could I refuse the 'bright' part of the sentiment some neon inky love? :)
tips and tricks
  • In order to make my neon inking easy peasy, I administered stamp surgery to the 'bright' stamp. I chopped it up letter by letter *gasp!*. For easy inking, I then placed it back together again on my block (don't worry, it fits together again perfectly), then removed various letters before inking up with a neon ink. Doing it this way makes it less fiddly to ink up individual letters whilst being able to line up the whole sentiment perfectly still.  
  • With this design, it's important to be as central as possible with the stamping. To ensure this, I measure the mid-point on my card before I do any stamping and line all stamping up with that mark. I like to use this fabulous ruler for finding the mid-point of anything; it never leaves my desk.
My design is super simple and super quick to create. That's the way I like to make the majority of my Christmas cards. It's always a bonus if they're flat for posting too!*wink*

Merry & Bright

I whipped up a few of these cards with different neon colours for some variation (Also to keep me sane. I'm not good at mass producing; I get bored too quickly!). I think I'm linking the pink and green version best; It's an intensified version of my fave red and green colour combo for the holidays. :)

Check out Uniko Studio blog for more sneaky peeks of this great set, and be prepared for more Christmas cards if you fancy sticking around this week. I think it could be the first time ever that my Christmas cards are finished before December 24th! Ha!

Signature2


Products Used
Note: All Occasion Sentiments #4 is not available for purchase yet. It will be added to my list of supplies once it's released. :)

Friday 18 October 2013

Falling for fall colours (and leaves!)

celebrate
Hey!

Hooray for Friday! I'm super excited to see it roll up as my guy has been away this week in Paris for work (Work? Really? Jealous? Moi? Oui!) and returns home today. :)

Another reason to celebrate today is that it's time for another Uniko Studio Challenge!


Can you believe that we're on challenge #4 already? This month's challenge is one that really hits my weak spot: Fall Foliage. I have a huge love for autumn: the colours, the falling leaves - the whole season!

I'm still hooked on a colour combo courtesy of Design Seeds for autumnal creations after using it on an earlier project. So apologies, but I used it again here! :)

Bonus points on this card too for using up some older, but not unloved, supplies: Perfect Pearls by Ranger. Remember those things? You may still use them, but I have a few that have hardly been used. I couldn't resist opening up and dusting gold over leaves stamped with Versamark ink.

celebrate close up
It's a pain to photograph the shimmer but trust me, it's there. *wink*
tips and tricks
  • I cut squares of coloured cardstock, stamped my leaves, and dusted with Perfect Pearls before cutting them up into triangles. It can be quite fiddly to stamp and dust gold dust on a tiny triangle.
  • To cut my triangles, I simply cut from two corners of a square to the midpoint. Each square therefore makes four triangles.  If you want to create an equilateral triangle, simply cut from the corners to the mid point of the opposite side (does that make sense?!) 
We'd love for you to join in the fun with us. Check out the full deets, and inspirational projects from the rest of the Uniko Studio DT here!

Have a great weekend!

Signature2

Products Used


Saturday 12 October 2013

Leaves disguised as trees...(and a winner!)

thinking of you
Hey!

Happy Saturday! It's one that I'm lovin' today as we've got a weekend with nothing planned! It's been months since my guy and I actually had a weekend to catch up with things. First on my list of things to do is to share my card with you for the new Clearly Besotted Challenge, as well as drawing a winner from the CBS 1st Birthday Blog Hop. :)


But first, the challenge! For this month's challenge you have two options:
  1. Create an autumnal/fall themed project and/or
  2. Use a few colours from the following colour combo:
Image from Design Seeds.

I decided to combine both options and create an autumnal(ish) card using that colour combo. It's not a colour combo I'd pick myself, but I loved how it lead me to create a card that I think could pass for a masculine card.
tips and tricks
  • The trees on this card have been created by die cutting a large leaf, and layering a smaller leaf from the Fancy Florals Die Collection on top. Using the leaves as trees creates a real clean, modern feel to the design.
  • The panel of fine linen card was a little too plain, so I added some stripes from the Basic Stripes set with Versamark ink. It's really subtle, but makes a real difference - trust me!
So are you ready to rock that colour combo, or to get autumnal with your creativity? I really hope you can play along with us. Oops! I forgot to add: a randomly selected entry will win £30 Clearly Besotted store credit too!

Here are the deets:
  • Your project must contain at least one Clearly Besotted product
  • It must be posted on your blog or an online gallery and linked up
  • The closing date for entries is Wednesday 23 October 2013 (23:55 GMT)
  • Multiple entries are welcomed but must be a new project each time
If you haven't got your inky mitts on any CBS goodies, then feel free to work with the CBS digital freebies instead. Oh, and for more inspiration/mojo boosting for the challenge, be sure to check out what the amazing DT created. SERIOUS inspiration! :)

And before I dash off to tackle more on my to-do list, here's the winner from the CBS 1st Birthday Blog Hop:


Number 345 which means that the lucky winner of my Modern Christmas stamp set is NatQuebec! Congrats! Please email me your address (see the contact me tab at the top of my page for my email addy) and that set will be on its way to ya!

Thanks so much for stopping by here today. I hope you have a great weekend! :)

Signature2
Product Used


Saturday 5 October 2013

We three kings trees

Three Trees
Hey!

Happy Saturday! Happy World Card Making Day! Happy Birthday, Clearly Besotted Stamps! 


Can you believe it? CBS is turning one already!  Only seems like yesterday that CBS opened its virtual doors for business - how time flies!

Stephanie (owner of CBS), is celebrating by giving you a 10% discount code (enter BDAY01) that will remain active from October 5th - October 8th. Before you dash to get your discount, you may want to wait until the new release is available for purchase which is in the extremely early hours of tomorrow (Just past midnight tonight!) *wink*

We're also celebrating the occasion with the most fabulous blog hop full of stamping talent. Honestly, I'm tickled pink to be a part of it! You should have hippety hopped over here from Stephanie's blog. If you haven't, be sure to start out there.

My card for today uses the new set, Modern Christmas, (designed by me! I'm so thankful for CBS releasing my designs! Exciting and nerve wrecking at once - ha!) Although I've been using the sentiments of this set throughout the week, I thought it was about time I inked one of the trees from the set. Many of the sentiments in this set fit perfectly into the dies from the 'Tag Along Die Collection' as well. I used the end of a the banner die from the collection to stamp my sentiment on to but I know that I'll be stamping sentiments from the set on to the tags in no time! :)

Seeing as I've inked up my Modern Christmas stamp set, I'm giving it away on this post!


To be in with a chance of winning this set, simply leave me a comment on this post and I'll pick a random winner. In addition to this, one randomly selected commenter from all the comments on the participating blogs will win a grand prize of $75 Simon Says Stamp gift certificate and £100 Clearly Besotted gift certificate! Wowzers! :D

Now I won't babble as there's a lot of amazing peeps, projects and prizes to check out. Next on your hopping adventure is my fellow CBS teamie and friend, Caryn!

Thanks so much for stopping by here today. I hope you have a great weekend, a fabulous World Card Making Day, and happy hopping! :)

Signature2

Copyright/Disclosure

I am on various design teams and receive free product to use and promote. I geniunely love the products of the companies and all opinons are honest and my own.

I'm flattered if I've inspired you and you want to CASE anything of mine, but please don't enter it for commercial publications or competitions.
Thank You!
All designs, text, and photographs on Crafting Confessions are ©2009-2016 to Amy Gray unless stated otherwise.