Showing posts with label Nestabilities. Show all posts

Tuesday, 4 March 2014

Bicycle Love

Bike Birthday
Hey!

Although I've been playing catch up here on the blog, nothing has stopped for the Clearly Besotted Stamps sneaky peeks of the new March release (available for purchase Wednesday 5th March at 22:00 GMT).

I'm waaaaaaaay behind on getting projects whipped up for the sneak peeks. I'm so lucky that Stephanie is been so understanding and is letting me play catch up! Apologies for the poor pics - I'm desperately trying to shoot in daylight but time is always against me at the moment. Bring on those summer nights LOL!

Birthday Bike Close Up

So today's card gives you a sneaky peek at two new sets. I know it's pretty tough to pick a favourite, but I'm going to go ahead and declare that the set Good Times is simply awesome. I love that bicycle! The sentiment is from the set Take Flight. I just love the font of it and figured that it paired nicely with this fun CAS design. :)
tips and tricks
  • To line the bicycle up on the card-base and patterned paper, I stamped it first on the card base and then on a piece of patterend paper which I then die cut. Simply layer the patterend piece on top of the bicycle stamped on the card and line them up.
  • I used a simple masking technique to control the amount of hearts coming from the front basket of the bicycle. The heart stamp is actually much bigger than this and contains lots of sweet hearts. For less hearts, and more direction simply attach a Post-It note to the top of the basket and stamp over it.
  • The red hearts combined with the red strips give three pops of red and help balance the design.
Right, I'm off to stamp and play catch up with the amazing CBS DT and guesties! In the meantime, please do pop across to Stephanie's to check out some more tempting sneak peeks from this month's release including links to the rest of the DT sharing fabulous projects. You won't leave disappointed! :)

Signature2


Monday, 24 February 2014

Art Deco Die Cutting...

Party Time 
Hey!

Happy Monday! I hope the start of the week is treating you well. :)

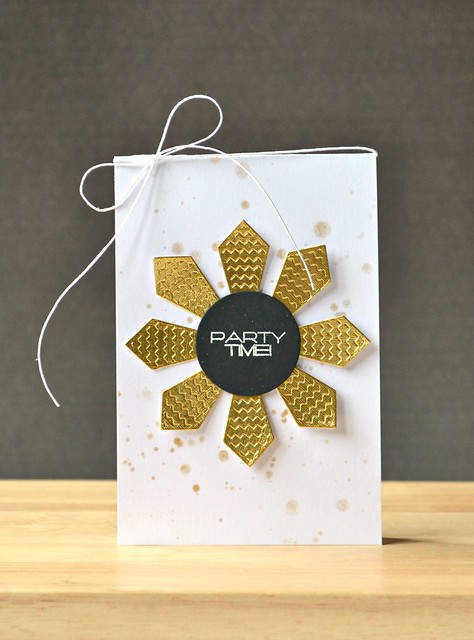
I'm popping in today with a project that is totally inspired by my love for the 1920s art deco movement. If you're raising an eyebrow, think Great Gatsby and you're there already! *wink*

Party Time Front

Now this focal point was created with a Spellbinders circle die and the tiny tie die from Top Dog Dies' Photo Prop Die Set. Yup, a few die cut ties placed under a die cut circle creates a focal point that makes me want to put on a 1920s flapper dress and do the Charleston. :)

tips and tricks
  • In order to space out the rays/ties evenly, I attached four behind my circle at 90 degree angles and then placed the remaining four inbetween each one (does that makes sense?)
  • The splattered background was created by mixing gold Perfect Pearls with water and flicking it on to the card-base with a paintbrush. More water gives a more diluted splatter and less water intensifies the gold sparkles. Blast it with a heat gun if you're impatient in letting it dry like me! :)
  • I added more dimension to the focal point by slightly lifting up the rays from the card base. This is easy if you only place adhesive behind the circular section of the focal point.
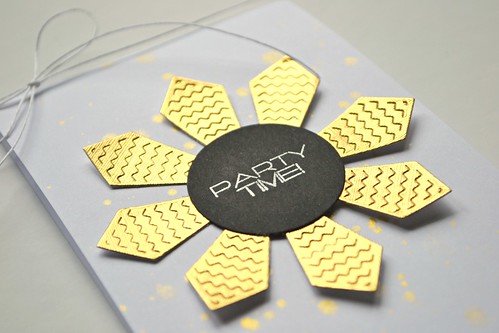
You're going to have to trust me when I say that the gold shimmers beautifully if you're holding this card for yourself. My photography hasn't captured it too well. Hopefully you get the idea with this close up anyway. :)
 
Party Time Close Up

Well that's enough flapping and babbling from me today. Thanks so much for stopping by!

Signature2


Products Used
The gold card is from my stash - I've no idea where it's from, but I've suggested an alternative. Sorry!

Tuesday, 30 April 2013

For the guys (and the gals!)

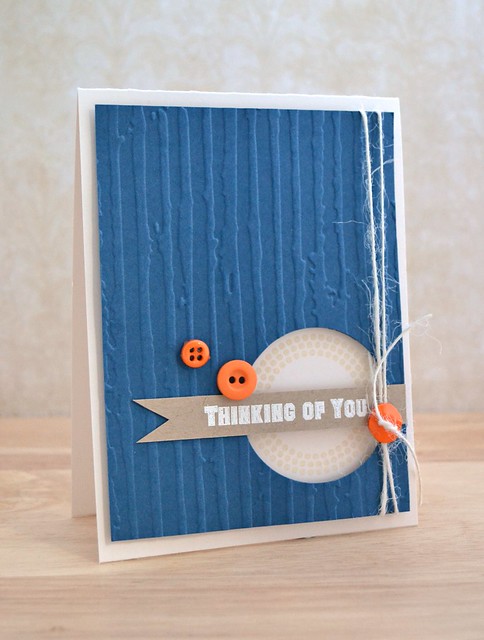
Thinking of You
Hey!

So I'm busy this week studying. I love to learn so I'm not complaining, and I'm especially not complaining when it's a card class! :)

Yup, the His & Hers online card class started on Monday and boy, am I  glad I signed up after only Day 1! I'm a girl with a lot of guys in my family, so I'm hoping to build up a stash of guy cards and maybe - just maybe - conquer that little bit of fear I experience when I have to create for a guy!

Day 1 was all about the simple 'Thinking of You' card. The idea is to use a technique, product, sketch etc and make it cater for both the guys and the gals.

Kristina Werner featured a great sketch that I couldn't resist and both Jennifer McGuire and guest designer, Lisa Spangler featured the same products for their cards. Jennifer also featured an awesome technique that I hope to use later on...*wink*

So armed with a sketch and a stamp that I wanted to use on both cards, I got busy.

The card at the top is my guy card (I hope you can tell it's a guy card) and this card below is my gal card:

Thinking of You

Now I thought I'd be struggling with the guy card, but it was actually the gal card that had me scratching my head and walking away for cups of tea! What can I say? The course must be conquering that fear of mine already - ha!

As always, thank you so much for stopping by this little corner of Blogland. Hoping to be back soon with some more guy cards (and gal cards of course!)

Signature2


Products Used

Tuesday, 31 January 2012

For Cath (sans CHA) with Love Blog Hop

Hey!

Welcome to a special blog hop (if you've not visited as part of a the hop be sure to start here or here!)

Unless you've been hiding under a rock, you'll know that a lot of crafty peeps are having a whale of a time at CHA right now...but there are some of us who just have to sit drooling and stroking our monitors as we're updated with the pictures. Included in that group of people is not only myself, but for this year it includes the totally Moxie Fab, Cath Edvalson ...

Cath is the ultimate trend detective and it's the first time in six and a half years she's unable to attend CHA. So here in Blogland we're throwing her a special get-well soon blog hop to cheer her up (fingers crossed it works!)

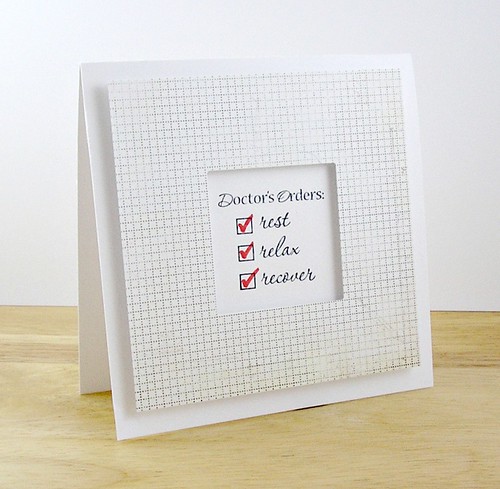
So without further ado, follow the instruction on my card and get well soon, Cath!

Rest Relax Recover

Yay! Check out the DP usage on this! Yup - I'm slowly working my way through my stash; this card features some Basic Grey gorgeousness. I wanted to keep the card kinda clinical and clean with those ticks providing the perfect pop of red :)

I'd like to extend a HUGE thanks for both Lorena and Virginia for organising this sweet hop and for inviting me - thanks ladies, you're both so sweet and sum up exactly what's so special about this creative community we have here ♥!

Be sure to hop along now with me to check out what everyone else created to spread the Blog-land-lovin' :)

Thank you so much for stopping by today!

Catch ya later!


Card Deets
{Doctor's Orders}
Stamps: Doctor's Orders (Taylored Expressions)
Ink: Tuxedo Black (Memento)
Cardstock: White (Papertrey Ink)
Patterned Paper: Basic White 6x6 Collection (Basic Grey)
Accessories: Square Nestabilities, Grand Calibur (Spellbinders)/Red Promarker

Monday, 1 August 2011

All good things must come to an end...

Hey!

Happy Monday, peeps! I hope you all had a fabby weekend! Mine was spent creating chaos in my crafting corner studio for another round of.....


Yup! Did you hear me screaming on Friday when I found out the amazing news that I'd made the final of Gallery Idol?! Well I was screaming, jumping up and down and dare I admit it? I even did a li'l dance (I was alone at home when I found out so no-one saw me!) Why am I here? Well it's because of you wonderful people who voted for me! Thank you SO MUCH! I am honestly at a loss for words for just how overwhelmed and thankful I am; I want to come and thank you all in person ♥

For this final round we were given just 3 days to come up with 3 party-themed projects. My first thought was, "Phew! It's not more fabric!" LOL!

I wanted to come up with a solid theme and purpose to my party (that's three quarters of the design process IMHO!) I decided to use a purpose for an actual party we're hoping to have soon: a leaving party for my friend and colleague, Sarah.

Picture the scene: it's a beautiful day, we're enjoying drinks outdoors in the garden surrounded by the lovely Derbyshire countryside - bliss!

Keeping this in mind, I adopted a rustic/countryside/farmhouse kinda colour scheme (I often drool over a farmhouse kitchen just down the road from me with this colour scheme - it's gorgeous!) and used a butterfly as my motif - not only in keeping with the outdoors/countryside feel - but as a metaphor for Sarah leaving: she's spreading her wings and flying on to new adventures (and I'll miss her terribly!)

With all that figured out - here's the three projects I created:

Project One - Invitation
Well it wouldn't be a party without guests, right?!

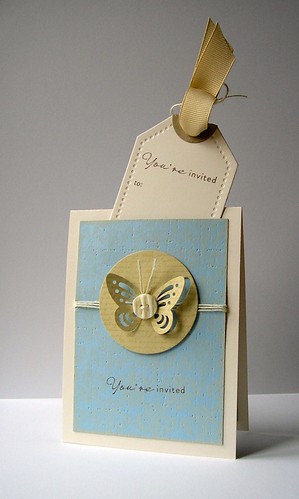
Invite

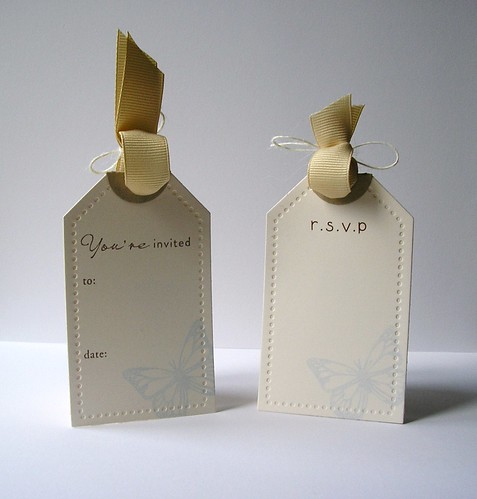
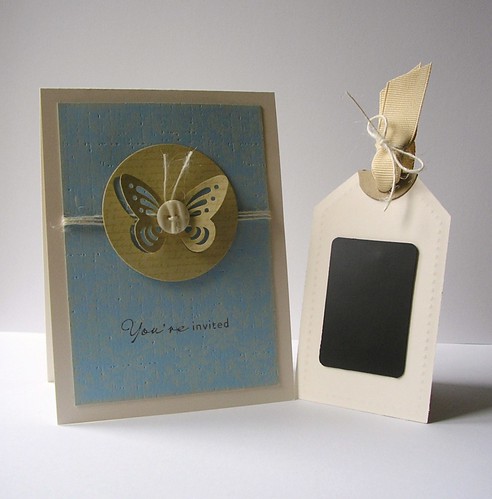
This invite has a removable tag with all the details of the party on. The pocket for the tag is simply created by using super sticky tape on all edges except the top edge of my card front.

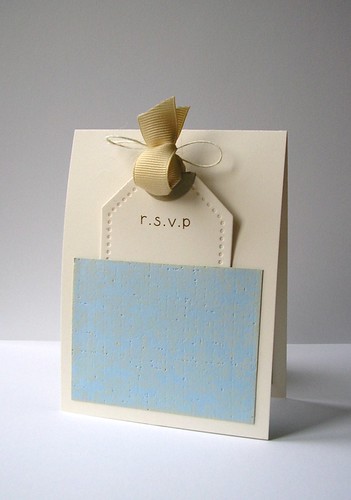
But it doesn't stop here; once you open the invite, you'll notice that I've included an RSVP too. This allows the recipient to easily RSVP in style :)

RSVP

Tags

And that's not all! Just as a finishing touch, I adhered a magnetic strip to the back of the invite tag. I know a lot of people use their fridges as pinboards and if you do, at least you won't have to find a spare magnet to 'pin' this invite to it!

invite and reverse tag

Project Two - Drink in Style!
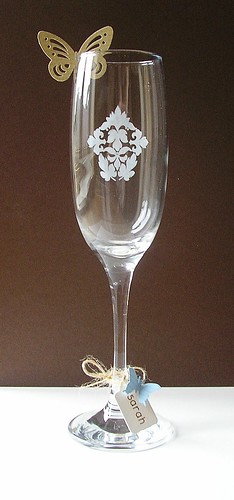
The champagne will be flowing at the party (I'm quite partial to an elderflower champagne y'know *yummy!*) so I went ahead and stamped directly on to a champagne glass.

glass2

Yes. It took me more attempts than I can remember to get the gist of this, but I'll spare you stress of going through it yourself and give you some pointers:
  • I used white Staz-On ink (it gives a nice frosted effect) but from then on gently handwash/rinse the glasses for future use!
  • Ink your stamp up then stamp on scrap paper a couple of times before attempting to stamp directly on to the glass. Too much ink will make your stamp slip and slide uncontrollably on your glass resulting in a white splodge!
  • Gently place the glass at one edge of the stamp and roll it across the stamp ensuring the stamp follows the curve of the glass.
  • If you end up with a splodge - simply wipe away with a wet-wipe straight away, dry with kitchen towel and start again. You don't need to find a new glass!
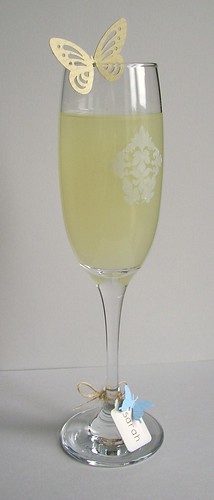
In addition to the stamped glass I also created a drink charm as well as a butterfly decoration for the rim of the glass so you can drink in style and know which glass is yours!

Glass

The twine on the charm continues the rustic theme :)

This glass looks much more impressive IRL - I've come to learn that photographing glass can be a nightmare!

Project Three - Party Favour
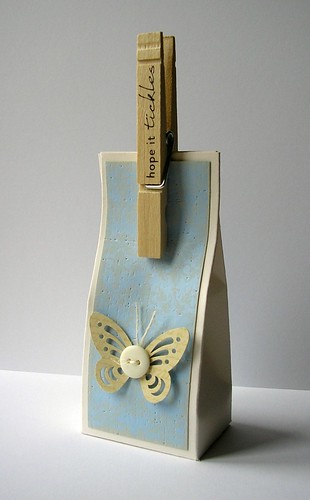
Now I can't have guests leaving empty handed so I created a sweet little party favour container which can be filled with a nice treat.

Treat Holder

I loved the idea of using a clothes-peg as my fastening; I wanted to keep that rustic/country feel and thought this was perfect. I also stamped my sentiment on the peg - I love that sentiment; it seems so fitting for a party favour!

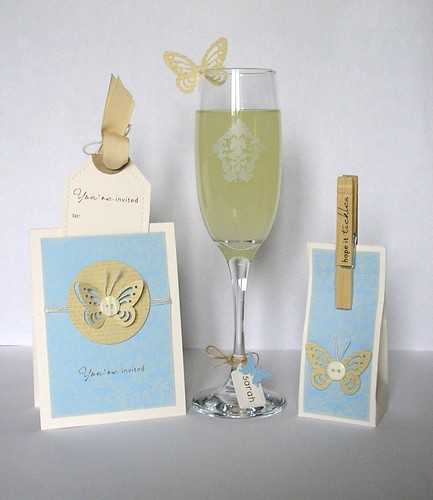
So there you have it! My leaving party ensemble:

Party Projects

I hope you can come! If my invite doesn't make it to you in time, you can always RSVP by checking out my project on Gallery Idol and considering voting for it, or simply leaving a comment *wink*

Sadly, this is the final round of the competition and I'm gonna miss all this excitement every week (I won't miss the stress and beads of sweat of it btw!) so whatever the result, this is the end. I feel like a total winner making it to the final and having so many of you being there cheering me on; so I urge you to go and check out all of the entries and vote for your favourite!

I think that's enough babbling for one Monday! I'm off to catch up on all the household chores I put to one side during these few weeks of the competition - there's a lot to do. I may be some time....!

Catch ya later!


Party Ensemble Deets
{You're Invited}
Stamps: 'You're Invited' - Frame It (Waltzingmouse Stamps)/'To','Date' - Tiny Tags, Damask Designs, Butterfly - Butterfly Dreams, Background Basics: Text Style (Papertrey Ink)
Ink: Vintage Cream, Spring Rain (Papertrey Ink) Rich Cocoa (Memento Ink) Versamark
Cardstock: Vintage Cream, Spring Rain, Fine Linen, Kraft (Papertrey Ink)
Accessories: Cream Button, Cream Button Twine, Linen and Canvas Impression Plate, Tag Die, Fine Linen Grosgrain Ribbon (Papertrey Ink)/ Butterfly Punch (Tonic)/Cuttlebug/Circle Nestability/Alphabet Transfers (Doodlebug)


{Drink in Style}
Stamps: Damask Designs, Tiny Tags (Papertrey Ink)
Ink: Spring Rain (Papertrey Ink)/ Versamark/Opaque White (Staz-On)
Cardstock: Vintage Cream, Spring Rain, Fine Linen (Papertrey Ink)
Accessories: Butterfly Punches (Tonic & Martha Stewart)/Tiny Tags Die, Ribbon Twine (Papertrey Ink)/Cuttlebug/ Alphabet Transfers (Doodlebug)


{Party Favour}
Stamps: Damask Designs, Background Basics: Text Style (Papertrey Ink)/'Hope it Tickles' - Frame It (Waltzingmouse Stamps)
Ink: Vintage Cream (Papertrey Ink)/Tuxedo Black (Memento)/Versamark
Cardstock: Vintage Cream, Spring Rain, Fine Linen (Papertrey Ink)
Accessories: Butterfly Punch (Tonic)/Canvas and Linen Impression Plate, Cream Vintage Button, Twine (Papertrey Ink)/Cuttlebug/Clothes-peg (own supply!)

Copyright/Disclosure

I am on various design teams and receive free product to use and promote. I geniunely love the products of the companies and all opinons are honest and my own.

I'm flattered if I've inspired you and you want to CASE anything of mine, but please don't enter it for commercial publications or competitions.
Thank You!
All designs, text, and photographs on Crafting Confessions are ©2009-2016 to Amy Gray unless stated otherwise.